
How to Install Loft Ladders
Loft ladders are the primary way to gain access to your loft without the need for any extensive construction work. Without a loft ladder, you’ll be depriving yourself of easy access to what can be an immensely useful room in your home, either as extra living space or a good storage option amongst other things.
We’re here to tell you that loft ladder installation isn’t quite the impossible job it seems, making it within the reach of a relatively capable DIYer..
What if you don’t have a loft opening?
If you don’t have a loft opening, you have a harder task ahead of you than simply installing it into a pre-existing opening. First, you should understand that once you add a loft opening, you will lose some heat efficiency, though this can be addressed somewhat with an insulated loft hatch.
First, to get started adding a loft hatch, you will require the following:
- Measuring Tape – You will need a measuring tape in order to figure out the dimensions of your loft opening.
- Cutting Tool – A jigsaw or a reciprocating saw will be strong enough to efficiently cut a hole in the ceiling.
- Frame – The frame is what will hold the loft hatch in place. It lines the opening you will be creating. Coming with the frame should be the screws/nails you need.
- Stud Detector – A stud detector can detect dense material behind the surface and alerts the user. This is useful to find out where it is safe to cut when you’re finding an opening for your loft.
- Level/Plumb Tool – A level/plumb is a long, flat tool with a bubble or a vial of liquid inside. It is used to indicate whether the surface it is placed on is level, meaning horizontal, or plumb, meaning vertical. This is important for safety concerns, as an uneven ladder could lead to balance issues.
Depending on the frame you choose, you may need:
- Power Drill – Some ladder frames don’t come with pre-fixed screw holes. In those cases, you will need to drill your own holes.
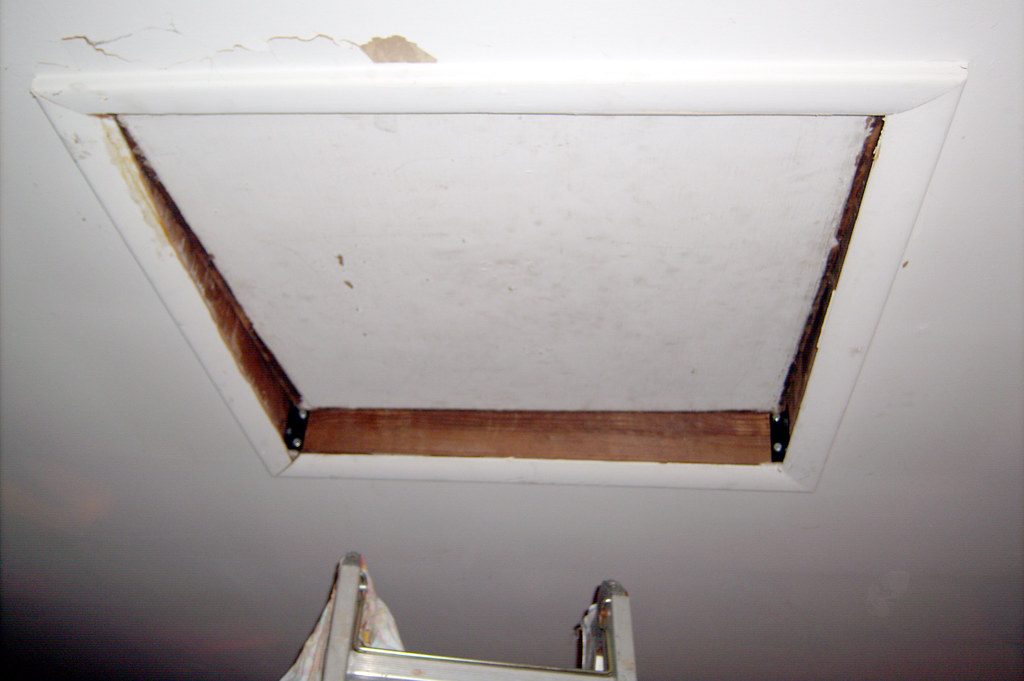
Here is the step-by-step guide to creating a loft opening:
- Find a spot – Decide where you want your loft opening to be.
- Measure and mark your opening – You will need to decide how big your opening will be on your own, but understand that it will need to conform to the loft frame you’re going to be buying. For reference, the typical loft opening in the UK is around 700mm by 900mm and 750mm by 1200mm. When you’re finished measuring, mark the area.
- Cut your hole – Use your cutting tool to create the opening. Make sure there are no electric cords where you are cutting by using the stud detector. Protective gear may be a good idea to keep yourself from getting hurt.
- Place the Frame in the opening – This doesn’t mean installing with screws, but rather fitting the frame in the opening to determine how level it is. Use the levelling tool and adjust its fixture in order to ensure it’s perfectly horizontal. You can do this by placing the level on the frame horizontally and adjusting the until the bubble on the tool centres between two lines in the liquid. When it is, mark with a pen an outline of where the frame has to be placed in order to be perfectly level.
- Mark the height’s halfway point – Next, you need to measure the distance between the loft opening and the floor below it. Place the plumb against the edge of the loft opening, but place it so that it’s vertical. Then ensure the bubble is between the two lines once again. Similarly, mark this location
- (Depending on the frame) Drill the framing holes – The holes that are required in order to allow the frame to be attached to the joists and ladder do not always come pre-installed. In these cases, you must reference the manufacturer’s instructions to find the locations required and drill into them.
- Install the Frame – Place the frame between the areas marked with a pen. Then use screws that came with the frame to secure it firmly to the joists/rafters of the loft. With that, your frame should be in a centred position. This will allow for any installation made on the frame to be similarly centred.
How should I select my loft ladder?
The loft ladder you choose has to correspond with the dimensions of the frame you have chosen.
Another thing to consider is the intended use of your loft space. For example, are you using it for storage? If so, a ladder with wide treads and a high weight rating is what you need. Take a look at what features you may want as well, as loft ladders can come with handrails, non-slip treads and hinges.
All BPS loft ladders come certified to the latest EN14975 standard.
What tools are needed to install loft ladders?
BPS Access Solutions make safety its utmost priority, so we will list everything you need. The tools you’ll need to do the job are:
- The Loft Ladder Kit – This is the kit you’ll get when you buy the loft ladder. It will be packed with several things. Obviously, the loft ladder itself will be included, but alongside it may also be the loft hatch it fits into. On top of that, it will come with the necessary fixings and brackets required to secure the loft hatch to the loft floor, and fittings such as hinges, springs and locking mechanisms. Of course, there are also instructions for installing the loft ladder.
- Screws – In order to fit the ladder to the floor, you will need either wood or masonry screws. The loft ladder you choose should specify if it doesn’t already come with the required bits.
- Tool for screwing – You can use a screwdriver or an electric screwdriver for screwing in the screws. We recommend the latter to maximise the stability of the frame.
You may also need:
- Safety Equipment – If your ceiling is at a height, then you’ll be installing at a height. In order to properly keep yourself safe from falling and hurting yourself, you should get yourself a safety harness or a pair of safety rails.
How to install the loft hatch and loft ladder
With the above steps followed, you’re now in the perfect position to install a loft ladder. The ladder itself is installed before the loft hatch.
Attaching the Loft Ladder to the Loft Frame
This part of the installation is much easier than the last one.
- Position the ladder so that it’s aligned with the ladder frame.
- Use your screwdriver/electric screwdriver to secure the ladder and frame together through screws.
- Test the ladder by both using it, and folding it, to see how well it functions. Adjust the height of the ladder’s placement in order to have it cleanly make contact without the ground and stay stable when climbing.
Installing the Loft Hatch
Next is attaching the loft hatch to the loft to complete the full installation.
- Place the hatch down adjacent to the edges.
- Install the hinges in the holes of the loft frame (refer to the manufacturer’s guide). Ensure that the bolts are secure.
- Attach the hatch to the hinges, and use the screws to bolt both together.
- Test the hatch by opening and closing it.
Once you’ve completed this, congratulations, you’ve successfully completed the installation process.
FAQs
Can I install a Loft Ladder without a frame?
It is possible, but not recommended. A frame is responsible for keeping the ladder stable. You would need to install loft brackets instead of a frame. Ladder brackets only support a ladder at two points in the loft opening, whilst a loft frame supports the ladder around its entirety. Ladder brackets also have less strength than an opening, meaning that the weight may damage the brackets.
Can I install a loft ladder in any type of ceiling?
Ceilings are usually made out of plasterboard or drywall, and loft ladders are usually built with these ceilings in mind. And whilst it’s possible to install a loft ladder in any type of ceiling, it may be harder for some materials. For example, for concrete ceilings, you may need to drill into the concrete to install the frame.
Also, for some lofts, you may find that your joists are uneven. You will need to install additional support to ensure stability. These supports could be straps made of metal or nylon webbing or blocks that can be cut and installed between joists. Alternatively, you could install cleats (wooden boards) that are installed at a right angle to the joists.
No related posts.
